ADJUSTMENT: This hanger provides for a vertical adjustment of 1 to 2 inches with the pipe and hanger in position. A temporary support is not required while adjustment is being made.
FINISH: Hangers can be furnished galvanized. Specify when ordering.
ORDERING: Specify figure number, pipe size and description.
MATERIAL: Yoke, load bolt and load distribution strap is chrome molybdenum steel. U-Bolt is stainless steel.
SERVICE: Recommended for suspension of high temperature piping requiring 4 to 6 inches of insulation.
MAX. TEMP: 1100°F
ORDERING: Specify figure number, pipe size and description.
MATERIAL: Yoke, load bolt and load distribution strap is chrome molybdenum steel. U-Bolt is stain-less steel.
SERVICE: Recommended for suspension of high temperature piping requiring 4 to 6 inches of insulation.
MAX. TEMP: 1100°F
ORDERING: Specify figure number, nominal pipe size, and description.
SIZE RANGE: 1/2 inch thru 36 inches
MATERIAL: Carbon steel
FINISH: Black or galvanized; furnished black unless otherwise specified.
SERVICE: Recommended for suspension of cold pipe lines or hot lines where little or no insulation is required.
MAX. TEMP.: 750°F
ORDERING: Specify figure number, pipe size, description and finish.
SIZE RANGE: 3 inches thru 36 inches
MATERIAL: Carbon steel
FINISH: Black or galvanized; furnished black unless otherwise specified.
SERVICE: Recommended for suspension of cold or hot pipe lines with heavy load having little or no insulation.
MAX. TEMP.: 750°F
ORDERING: Specify figure number, pipe size, description and finish.
SIZE RANGE: 1/2 inch thru 36 inches
MATERIAL: Carbon steel
FINISH: Black or galvanized; furnished black unless otherwise specified.
SERVICE: Recommended for suspension of cold or hot pipe lines requiring little insulation or insulation up to 4 inches
MAX. TEMP.: 750°F
ORDERING: Specify figure number, pipe size, description and finish.
 SIZE RANGE: 1/2 inch thru 36 inches
MATERIAL: Chrome molybdenum steel (ASTM A387)
FINISH: Black
SERVICE: Recommended for suspension of hot pipe lines requiring up to 4″ of insulation.
MAX. TEMP.: 1050°F
ORDERING: Specify figure number, pipe size, description and finish.
SIZE RANGE: 1/2 inch thru 36 inches
MATERIAL: Chrome molybdenum steel (ASTM A387)
FINISH: Black
SERVICE: Recommended for suspension of hot pipe lines requiring up to 4″ of insulation.
MAX. TEMP.: 1050°F
ORDERING: Specify figure number, pipe size, description and finish.
 SIZE RANGE: 1/2 inch thru 36 inches
MATERIAL: Carbon steel
FINISH: Black or galvanized; furnished black unless otherwise specified.
SERVICE: Recommended for suspension of cold pipe lines or hot lines where little or no insulation is required.
MAX. TEMP.: 750°F
ORDERING: Specify figure number, pipe size, description and finish.
SIZE RANGE: 1/2 inch thru 36 inches
MATERIAL: Carbon steel
FINISH: Black or galvanized; furnished black unless otherwise specified.
SERVICE: Recommended for suspension of cold pipe lines or hot lines where little or no insulation is required.
MAX. TEMP.: 750°F
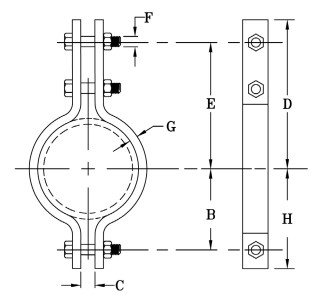
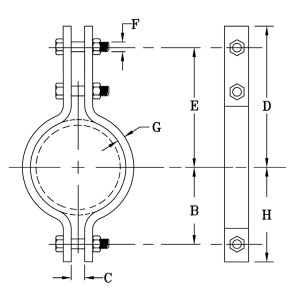
ORDERING: Specify figure number, pipe size, description and finish.
 SIZE RANGE: 1/2″ thru 24″
MATERIAL: Carbon steel
FINISH: Black or galvanized; furnished black unless otherwise specified.
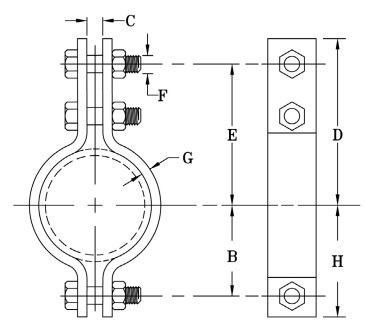
SERVICE: For support and steadying of steel pipe risers either insulated or bare, cast iron pipe, or conduit.
MAX. TEMP.: 650°F
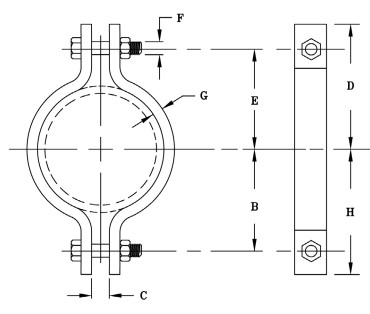
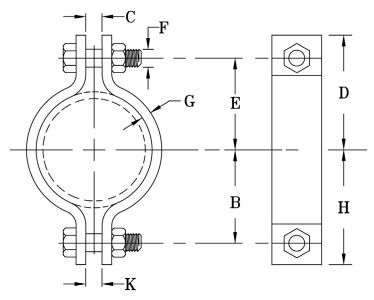
ORDERING: Specify figure number, pipe size, description and finish.
SIZE RANGE: 1/2″ thru 24″
MATERIAL: Carbon steel
FINISH: Black or galvanized; furnished black unless otherwise specified.
SERVICE: For support and steadying of steel pipe risers either insulated or bare, cast iron pipe, or conduit.
MAX. TEMP.: 650°F
ORDERING: Specify figure number, pipe size, description and finish.
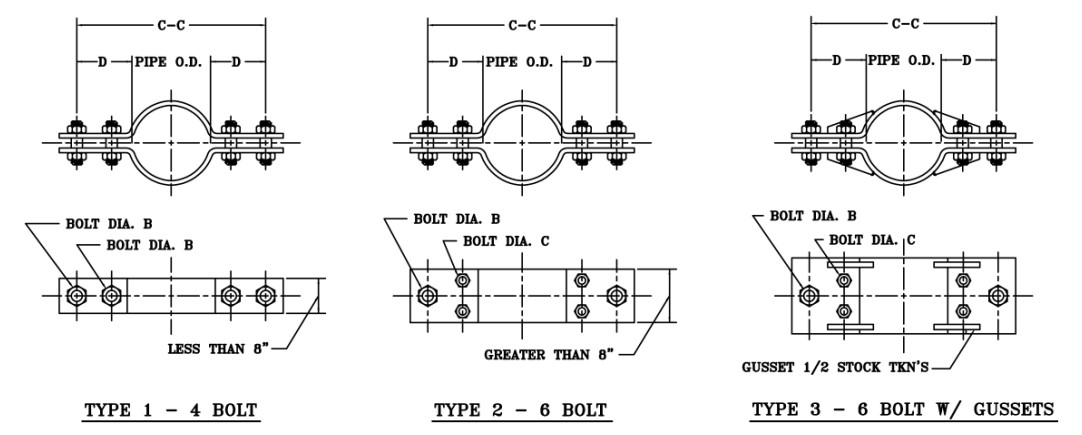
SERVICE:
In situations where the use of a welded lug attachment would create an undesirable crushing effect on the pipe wall, this clamp can transfer the load from the pipe wall to the riser clamp by means of hold-down lugs welded to the pipe.
Clamps may be furnished in either Carbon or Alloy steel with bolting to suit, using an allowable stress of 10,000 PSI. Temperature correction factors listed in “CHART A” are based on allowable stresses listed in MSS-SP-58.
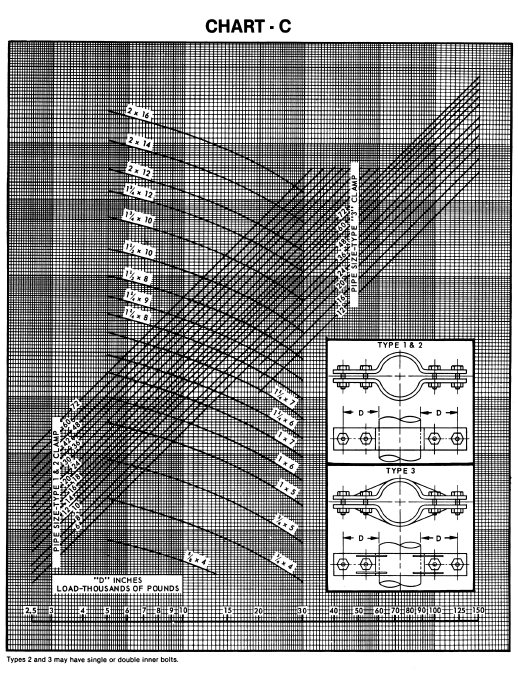
METHODS OF SELECTION:
1. Determine total load to be supported and service temperature of the piping system.
2. Refer to “CHART A (table below)” and determine the temperature correction factor for the clamp material being used.
3. Multiply total load by the correction factor to obtain a corrected load.
4. Refer to “CHART C (below)” and locate the point determined by the intersection of the total load co-ordinate and the pipe size curve. Project this point horizontally until it intersects with the “D” dimension coordinate. Directly above this point is the required stock size.
5. The bolt diameter is obtained by using the uncorrected total load and referring to “CHART B (below)”.
ORDERING: Specify pipe outside diameter, total load, design temperature, material and dimension “D” or center to center of hanger rods.
NOTE: Pipe clamp can be fabricated to any specified material.